Alphabetical Index
Keyword Search
Casting Defects
Ingot Defects
Slab Defects
Drawing Defects
Forging Defects
Rolling Defects
Bearing Defects
Coating Defects
Corrosion Defects
Fractography
Heat Treatment Defects
Machining Defects
Other Defects
Pipeline Defects
Polishing Defects
Rail Defects
Tool Steel Defects
Welding Defects
Internal Defects
Surface Defects
Internal + Surface Defects
Contact Us
Help
Home
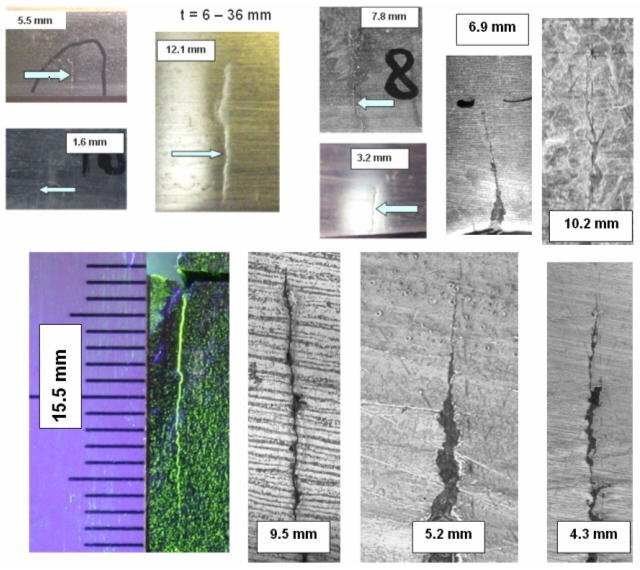
Different types of cracks in bars and retired-for-cause piping welds - Welding defects

Figure 1: Different types of cracks in bars and retired-for-cause piping welds.
Defect name: Crack
Record No.: 1879
Type of defect (Internal/Surface): Internal, surface
Defect classification: Welding defects
Steel name: Steel
Steel composition in weight %: No data.
Note: A Piping Pilot Study was performed to assess the capability of detection and sizing linear defects (EDM notches and fatigue cracks), as part of Performance Demonstration Initiative for CANDU Reactor Ultrasonic Inspection. The capability and limitations of tip-echo back-scattering technique and creeping waves-mode converted technique was assessed on a large variety of piping and pressure vessel samples with OD x t = 100 mm x 6 mm - 1,200 mm x 36 mm for carbon steel ASTM 106 Gr.B, austenitic steel ASTM 308 and dissimilar welds between carbon steel and stainless steel. The influence of defect orientation, height, location, piping counter-bore slope and length, weld geometric imperfection is presented for a large variety of probe frequency and size. The ligament assessment and the minimum crack height were also evaluated.
Optical/metallographic, phased-array and magnetic particles additional techniques were used to assess the "bench-mark" crack height. Examples of crack morphology are presented in Figure 1.
Reference: Not shown in this demonstration version.